|
This document describes how to add JBI components using the JBI_AddOns.zip file. It also describes how to deploy and run the loanDemoMain project with the added components.
This document describes how to deploy and run the loanDemoMain project using the added components.
System Requirements
This document assumes that your system meets the requirements specified in the System Requirements topic of the NetBeansTM Enterprise Pack 5.5 Release Notes.
Software Needed
To use the JBI_AddOns.zip file, ensure that you have installed either Java Application Platform SDK or Java EE 5 SDK Update 1.
Contents
Contents of the JBI_AddOns.zip
The JBI_AddOns.zip contains the following files:
| Folder |
Folder/File |
Description |
| Folder where you extracted the JBI_AddOns.zip file. |
JBI_AddOns.html |
This document describes how to add JBI components using the JBI_AddOns.zip file. It also describes how to deploy and run the loanDemoMain project with the added components. |
| components |
filebc.jar |
The File Binding Component performs message input and output for a JBI instance using the file system. Useful for simple integration scenarios and file-oriented protocols such as FTP. |
| jmsbc.jar |
The JMS Binding performs message input and output for a JBI instance using the Java Messaging System protocol. |
| xsltserviceengine.jar |
The Transformation Engine performs XSL transformation of XML documents. Useful for exchanging data between services. |
| images |
These are the images used by the loan application process. |
| loanDemoMain |
This Ant-based NetBeans project has targets for setting up the necessary projects and creating
the JMS resources that are required by other projects. Building this project builds all other JBI projects (not J2EE applications) and sets up the demo. Running the loanDemoMain installs the JBI bindings and engines and also deploys the composite application. |
| emailMDB |
This Enterprise JavaBean (EJB) NetBeans project is an message-driven bean (MDB) which listens to a Java Messaging Service (JMS) queue. When the MDB receives the message, it reads the contents of the message and sends an email using the email ID in the contents. This is deployed as a web service. |
| imqobjects |
The imqobjects directory contains artifacts needed by the JMS server to properly function. This directory is referenced in the build.properties. |
| lib |
The lib directory contains common code used by the loanApplication project. |
| loanApplication |
This web application NetBeans project can be accessed through http://localhost:8080/loanApplication. Use the values in the build.properties file if this URL is not working. The web application displays a form and is used to start the loan application process. |
| loanProcessorEJB |
This EJB NetBeans project is a stateless session bean which has the core logic of accepting and rejecting a
loan request based on the input. This is deployed as a web service. |
| loanReportTransformer |
This XSLT Module NetBeans project contains transformation logic from the XML file generated by the loanApplication project and the XML file report on the file system. The XSLT Module NetBeans project builds a service unit that is packaged by the loanRequestorCompositeApp |
| loanRequestorBpel |
This BPEL Module NetBeans project is the main Business Process Execution Language (BPEL) application that can be created using the Integrated Development Environment (IDE). The project contains the BPEL process which describes the work flow and the Web Services Description Language (WSDL) files that contain the service description of the services produced and consumed by the BPEL process. The BPEL Module NetBeans project builds a service unit that is packaged according to the BPEL engine requirements. |
| loanRequestorCompositeApp |
The Composite Application NetBeans project generates the service assembly that contains the BPEL, SOAP, XSLT, File, and JMS service units. |
| nbproject |
This folder contains files used to properly show the loanDemoMain project in the NetBeans IDE. |
| nbms |
This folder contains the design time NetBean modules. |
Adding the JBI Components
- Open the NetBeans IDE.
- In your file system, create a directory for the addons. This document uses <jbi-addons-home> to represent your folder.
- Download and extract the JBI_AddOns.zip file into <jbi-addons-home>.
- Add JVM option to increase memory:
- Click the Runtime tab, expand the Servers node, right-click the Sun Java System Application Server 9 node, and choose Start.
If the Start option is not available and there is a green triangle next to the Sun Java System Application Server 9 node, your server is already running.
- Right-click Sun Java System Application Server 9 and choose View Admin Console
- Login to the Application Server.
- Click Application Server > JVM Settings > JVM Options > Add JVM Options
- Add the option "-XX:PermSize=128m"
- Click Save and restart the Application Server.
- If any of the following JBI components have been previously installed, then you must uninstall them before reinstalling the additional JBI components:
- com.sun.xsltse-1.0-2
- com.sun.filebc-1.0-2
- com.sun.jmsbc-.0-2
To uninstall these files, follow these steps:
- Expand the Sun Java System Application Server 9 node, expand the JBI subfolder and expand either Service Engine or Binding Component, depending on which one you need to uninstall.
- Right-click on the component and choose Stop.
- Right-click on the component and choose Shutdown.
- Right-click on the component and choose Uninstall.
Now uninstall the design time components.
- Choose Tools > Module Manager.
- Expand CAPS, highlight the component or components you want to uninstall. Choose
- com.sun.xsltse-1.0-2
- com.sun.filebc-1.0-2
- com.sun.jmsbc-.0-2
- Click Uninstall.
- Click Close.
- Install the design-time modules.
- Choose Tools > Update Center.
- Click Install Manually Downloaded Modules Files (nbms) and click Next.
- Click Add and browse to <jbi-addons-home>/jbi-addons/nbms.
- Select the modules to install and click OK.
The modules to install are:
- com-sun-jbi-ui-devtool-projects-base.nbm
- com-sun-jbi-ui-devtool-projects-xsltpro.nbm
- com-sun-jbi-ui-devtool-wsdl-file.nbm
- com-sun-jbi-ui-devtool-wsdl-jms.nbm
- Click Next on the Select Modules to Install (continue) window.
- Click Next on the Select Modules to Install window.
- Click Accept on the License Agreement window.
- Click Next on the Download Modules window.
- Click all the boxes on the View Certificates and Modules window and click Finish.
- Check the boxes for Modules to Install and click Yes to all.
- Click Finish.
Install and start the Service Engine:
- Navigate to Sun Java System Application Server 9 node > JBI > Service Engines.
- Right-click Service Engines
and choose Install New Service Engine.
Select xsltserviceengine.jar in <jbi-addons-home>/jbi-addons/components, and click Install.
Notice com.sun.xsltse-1.0-2 has been added under Service Engines.
Right-click com.sun.xsltse-1.0-2 and choose Start.
The Output window displays "Started XSLT service engine successfully".
Install and start the Binding Components:
- Right-click Binding Components and choose Install New Binding Component.
- Select com.sun.filebc-1.0-2 and com.sun, com.sun.jmsbc-.0-2 in <jbi-addons-home>/jbi-addons/components, and choose Install.
Notice com.sun.filebc-1.0-2, com.sun.jmsbc-.0-2 have been added under Binding Components.
- Right-click com.sun.filebc-1.0-2 and choose Start.
The Output window displays "Binding com.sun.filebc-1.0-2 has been started".
- Right-click com.sun.jmsbc-.0-2 and choose Start.
The Output window displays: "Binding com.sun.jmsbc-.0-2 has been started".
Running the Loan Application Sample
Now that you have added and started the new components, you can run the Loan Application Sample by opening the loanDemo Main project, and then deploying and running the project. The loanDemo Main project and all necessary files are included in the JBI_AddOns.zip file. To understand the Loan Demo, see Loan Application Process Details. Before you deploy and run the loan demo, you must first modify the properties file.
Opening the loanDemo Main Project
- From the IDE's main menu, choose File > Open Project.
- Navigate to <jbi-addons-home>/jbi-addons/ and select loanDemoMain.
- Click Open Project Folder
Modifying the Properties File
The build.properties file must reflect your environment. To change the values, follow these steps:
- From the IDE's main menu, choose File > Open Project and choose loanDemoMain.
- Select loanDemoMain project and click Open Project Folder.
- Expand loanDemoMain and double-click build.properties.
The build properties file displays on the right.
- Search in the Application Server Configuration section for "appserver.home" and change the value to the location you chose for the installation of the AppServer when you installed the Tools Bundle. (For example C:/Sun/Appserver)
- Search in the Common Configuration section for "blueprints.home" and change the value to the location of your AppServer followed by "blueprints". For example: C:/Sun/AppServer/blueprints.
- Search for "mail.smtp" and change the value to the SMTP host server name to be used by the emailMDB.
The emailMDB sends a response email to the loan requestor.
Note: you cannot use a secure mail server.
- Review the file to ensure that other values are set according to your environment. For example:
- On a non-windows platform asant.bat should be asant and asant.exe should be asant.
- If you are using a platform other than Windows, modify the path and filenames accordingly.
- From the IDE's main menu, choose File > Save.
Deploying the loanDemoMain Project
Before you clean, build and deploy the loanDemoMain Project, ensure that the following components have been started:
- com.sun.xsltse-1.0-2
- com.sun.filebc-1.0-2
- com.sun.jmsbc-.0-2
- Right-click loanDemoMain project and select Clean and Build Demo.
The Output window displays BUILD SUCCESSFUL.
- Right-click loanDemoMain project and select Deploy Demo.
The Output window displays BUILD SUCCESSFUL.
Running the loanDemoMain Project
- Right-click loanDemoMain project and choose Start Demo.
This brings up the appropriate browser with the loan application URL.
- Or you can open a browser and go to
http://localhost:8080/loanApplication. If the application server is not installed with the default port, change the port number to your application server HTTP port number.
The following screen should appear:

Fill out the information and then click Process. You should see this response:
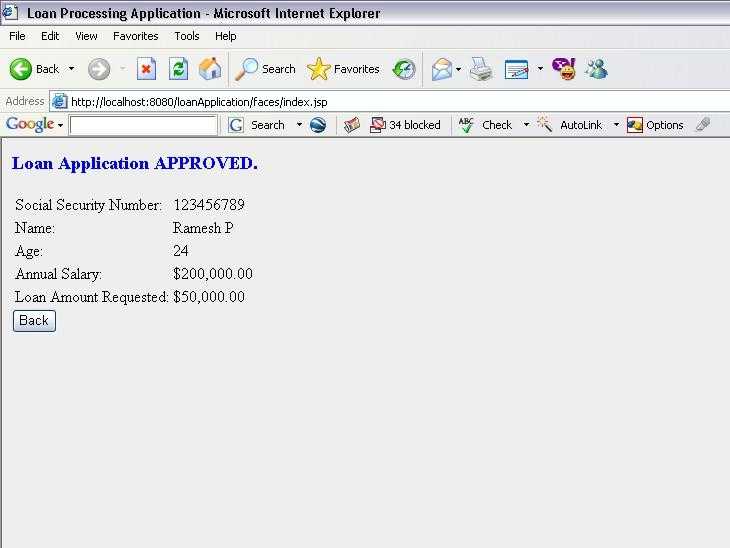
An email with the following content is sent to the loan requestor:
Dear Ramesh P,
Please find below the status of your request
Name : Ramesh P
Amount : 50000.0
Status : Loan Application APPROVED.
Best Regards,
Admin |
Loan Application Process Details
The following illustration demonstrates the loan process.
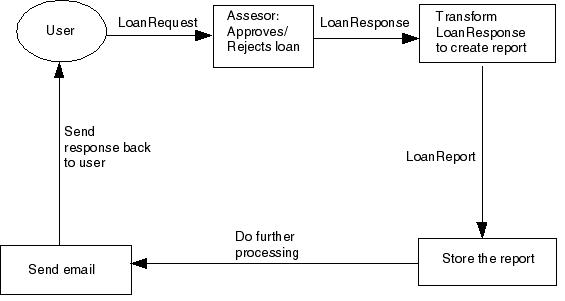
The user submits the information required to obtain the loan. The
information can be supplied though a web service client or an application client. For the
purpose of this scenario, we are using a web client. The user fills out a form with information such as name, age, salary, and email address. When the form is submitted, the request is sent to the appropriate URL where a SOAP Binding Component has been deployed. The JMS Binding Component receives the SOAP message and after converting it to a normalized message, routes the SOAP Message to the NMR and the NMR routes this message to the BPEL engine. The BPEL process (loanRequestorBpel) invokes the partner service (ejbInvoke), outside the JBI environment. The BPEL process sends a message to the Java EE Service Engine requesting a service that is provided by a JBI-enabled EJB (loanProcessorEJB) deployed in the application server. A deployment to the Java EE Service Engine is not an service unit, but could be any applications server component like a EJB or a servlet.
The Java EE Service Engine passes the request to the loanProcessorEJB deployed as a LoanApprover web service, which approves or rejects the loan request. The LoanApprover web service returns the response, which is a report either approving or rejecting the loan, to the BPEL engine. The BPEL Service Engine receives the response and sends it to the Transformation Engine and invokes the partner service (transformInvoke) which sends the message to the transformation engine service. The Transformation Engine transforms the message, using the loanReport.xslt, into an XML report and sends it to the BPEL engine. The BPEL engine receives the report, invokes the partner service (reportStoreInvoke), and then sends the message to the File Binding component. The File Binding component receives this message and writes the contents to a file in the folder specified during the service unit deployment. The File Binding component sends a DONE message back to the BPEL engine indicating the successful creation of the report. After receiving a response from the File Binding, the BPEL engine invokes the partner service (reportMailerInvoke) which sends the XML report as a message to the JMS Binding. The JMS Binding creates a text message with the contents and deposits it in the EmailBean Queue. This message can be picked up by any legacy applications or a message driven bean (MDB) and the loan processing
activities can be carried out. The JMS Binding sends a DONE status message to BPEL engine when the message is deposited in the queue. The emailMDB sends out the email to the loan requester which confirms or rejects the loan. The BPEL engine receives this response and sends the report back to the web-based service client (loan service consumer) where it can be displayed by the browser.
|