Class TreeView<T>
- Type Parameters:
T- The type of the item contained within theTreeItemvalue property for all tree items in this TreeView.
- All Implemented Interfaces:
Styleable,EventTarget,Skinnable
TreeItem). By using a TreeView, it is possible to drill down into the
children of a TreeItem, recursively until a TreeItem has no children (that is,
it is a leaf node in the tree). To facilitate this, unlike controls
like ListView, in TreeView it is necessary to only
specify the root node.
For more information on building up a tree using this approach, refer to the
TreeItem class documentation. Briefly however, to create a TreeView,
you should do something along the lines of the following:
 TreeItem<String> root = new TreeItem<>("Root Node");
 root.setExpanded(true);
 root.getChildren().addAll(
     new TreeItem<>("Item 1"),
     new TreeItem<>("Item 2"),
     new TreeItem<>("Item 3")
 );
 TreeView<String> treeView = new TreeView<>(root);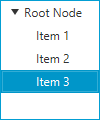
A TreeView may be configured to optionally hide the root node by setting the
showRoot property to false. If the root
node is hidden, there is one less level of indentation, and all children
nodes of the root node are shown. By default, the root node is shown in the
TreeView.
TreeView Selection / Focus APIs
To track selection and focus, it is necessary to become familiar with the
SelectionModel and FocusModel classes. A TreeView has at most
one instance of each of these classes, available from
selectionModel and
focusModel properties respectively.
Whilst it is possible to use this API to set a new selection model, in
most circumstances this is not necessary - the default selection and focus
models should work in most circumstances.
The default SelectionModel used when instantiating a TreeView is
an implementation of the MultipleSelectionModel abstract class.
However, as noted in the API documentation for
the selectionMode
property, the default value is SelectionMode.SINGLE. To enable
multiple selection in a default TreeView instance, it is therefore necessary
to do the following:
treeView.getSelectionModel().setSelectionMode(SelectionMode.MULTIPLE);
Customizing TreeView Visuals
The visuals of the TreeView can be entirely customized by replacing the
default cell factory. A cell factory is used to
generate TreeCell instances, which are used to represent an item in the
TreeView. See the Cell class documentation for a more complete
description of how to write custom Cells.
Warning: Nodes should not be inserted directly into the TreeView cells
TreeView allows for it's cells to contain elements of any type, including
Node instances. Putting nodes into
the TreeView cells is strongly discouraged, as it can
lead to unexpected results.
Important points to note:
- Avoid inserting
Nodeinstances directly into theTreeViewcells or its data model. - The recommended approach is to put the relevant information into the items list, and
provide a custom
cell factoryto create the nodes for a given cell and update them on demand using the data stored in the item for that cell. - Avoid creating new
Nodes in theupdateItemmethod of a customcell factory.
The following minimal example shows how to create a custom cell factory for TreeView containing Nodes:
  TreeItem<Color> treeRoot = new TreeItem<>();
  treeRoot.setExpanded(true);
  TreeView<Color> treeView = new TreeView<>(treeRoot);

  treeRoot.getChildren().addAll(
      new TreeItem<>(Color.RED),
      new TreeItem<>(Color.GREEN),
      new TreeItem<>(Color.BLUE));

  treeView.setCellFactory(p -> {
      return new TreeCell<Color>() {
      private final Rectangle rectangle;
      {
          setContentDisplay(ContentDisplay.GRAPHIC_ONLY);
          rectangle = new Rectangle(10, 10);
      }

      @Override
      protected void updateItem(Color item, boolean empty) {
          super.updateItem(item, empty);

          if (item == null || empty) {
              setGraphic(null);
          } else {
              rectangle.setFill(item);
              setGraphic(rectangle);
          }
      }
  };});
This example has an anonymous custom TreeCell class in the custom cell factory.
Note that the Rectangle (Node) object needs to be created in the instance initialization block
or the constructor of the custom TreeCell class and updated/used in its updateItem method.
Editing
This control supports inline editing of values, and this section attempts to give an overview of the available APIs and how you should use them.
Firstly, cell editing most commonly requires a different user interface
than when a cell is not being edited. This is the responsibility of the
Cell implementation being used. For TreeView, this is the responsibility
of the cell factory. It is your choice whether the cell is
permanently in an editing state (e.g. this is common for CheckBox cells),
or to switch to a different UI when editing begins (e.g. when a double-click
is received on a cell).
To know when editing has been requested on a cell,
simply override the Cell.startEdit() method, and
update the cell text and
graphic properties as
appropriate (e.g. set the text to null and set the graphic to be a
TextField). Additionally, you should also override
Cell.cancelEdit() to reset the UI back to its original visual state
when the editing concludes. In both cases it is important that you also
ensure that you call the super method to have the cell perform all duties it
must do to enter or exit its editing mode.
Once your cell is in an editing state, the next thing you are most probably
interested in is how to commit or cancel the editing that is taking place. This is your
responsibility as the cell factory provider. Your cell implementation will know
when the editing is over, based on the user input (e.g. when the user presses
the Enter or ESC keys on their keyboard). When this happens, it is your
responsibility to call Cell.commitEdit(Object) or
Cell.cancelEdit(), as appropriate.
When you call Cell.commitEdit(Object) an event is fired to the
TreeView, which you can observe by adding an EventHandler via
setOnEditCommit(javafx.event.EventHandler). Similarly,
you can also observe edit events for
edit start
and edit cancel.
By default the TreeView edit commit handler is non-null, with a default
handler that attempts to overwrite the property value for the
item in the currently-being-edited row. It is able to do this as the
Cell.commitEdit(Object) method is passed in the new value, and this
is passed along to the edit commit handler via the
TreeView.EditEvent that is fired. It is simply a matter of calling
TreeView.EditEvent.getNewValue() to retrieve this value.
It is very important to note that if you call
setOnEditCommit(javafx.event.EventHandler) with your own
EventHandler, then you will be removing the default handler. Unless
you then handle the writeback to the property (or the relevant data source),
nothing will happen. You can work around this by using the
Node.addEventHandler(javafx.event.EventType, javafx.event.EventHandler)
method to add a editCommitEvent() EventType with
your desired EventHandler as the second argument. Using this method,
you will not replace the default implementation, but you will be notified when
an edit commit has occurred.
Hopefully this summary answers some of the commonly asked questions. Fortunately, JavaFX ships with a number of pre-built cell factories that handle all the editing requirements on your behalf. You can find these pre-built cell factories in the javafx.scene.control.cell package.
- Since:
- JavaFX 2.0
- See Also:
-
Nested Class Summary
Nested ClassesModifier and TypeClassDescriptionstatic classAnEventsubclass used specifically in TreeView for representing edit-related events. -
Property Summary
PropertiesTypePropertyDescriptionRepresents the cell factory that will be used for creating TreeCells, which are used to represent items in the TreeView.final BooleanPropertySpecifies whether this TreeView is editable - only if the TreeView and the TreeCells within it are both editable will a TreeCell be able to go into their editing state.final ReadOnlyObjectProperty<TreeItem<T>> A property used to represent the TreeItem currently being edited in the TreeView, if editing is taking place, or null if no item is being edited.final ReadOnlyIntegerPropertyRepresents the number of tree nodes presently able to be visible in the TreeView.final DoublePropertySpecifies whether this control has cells that are a fixed height (of the specified value).final ObjectProperty<FocusModel<TreeItem<T>>> The FocusModel provides the API through which it is possible to control focus on zero or one rows of the TreeView.final ObjectProperty<EventHandler<TreeView.EditEvent<T>>> This event handler will be fired when the user cancels editing a cell.final ObjectProperty<EventHandler<TreeView.EditEvent<T>>> This property is used when the user performs an action that should result in their editing input being persisted.final ObjectProperty<EventHandler<TreeView.EditEvent<T>>> This event handler will be fired when the user successfully initiates editing.Called when there's a request to scroll an index into view usingscrollTo(int)final ObjectProperty<TreeItem<T>> Property representing the root node of the TreeView.final ObjectProperty<MultipleSelectionModel<TreeItem<T>>> The SelectionModel provides the API through which it is possible to select single or multiple items within a TreeView, as well as inspect which rows have been selected by the user.final BooleanPropertyProperty that represents whether or not the TreeView root node is visible.Properties declared in class javafx.scene.control.Control
contextMenu, skin, tooltipProperties declared in class javafx.scene.layout.Region
background, border, cacheShape, centerShape, height, insets, maxHeight, maxWidth, minHeight, minWidth, opaqueInsets, padding, prefHeight, prefWidth, scaleShape, shape, snapToPixel, widthProperties declared in class javafx.scene.Parent
needsLayoutProperties declared in class javafx.scene.Node
accessibleHelp, accessibleRoleDescription, accessibleRole, accessibleText, blendMode, boundsInLocal, boundsInParent, cacheHint, cache, clip, cursor, depthTest, disabled, disable, effectiveNodeOrientation, effect, eventDispatcher, focused, focusTraversable, focusVisible, focusWithin, hover, id, inputMethodRequests, layoutBounds, layoutX, layoutY, localToParentTransform, localToSceneTransform, managed, mouseTransparent, nodeOrientation, onContextMenuRequested, onDragDetected, onDragDone, onDragDropped, onDragEntered, onDragExited, onDragOver, onInputMethodTextChanged, onKeyPressed, onKeyReleased, onKeyTyped, onMouseClicked, onMouseDragEntered, onMouseDragExited, onMouseDragged, onMouseDragOver, onMouseDragReleased, onMouseEntered, onMouseExited, onMouseMoved, onMousePressed, onMouseReleased, onRotate, onRotationFinished, onRotationStarted, onScrollFinished, onScroll, onScrollStarted, onSwipeDown, onSwipeLeft, onSwipeRight, onSwipeUp, onTouchMoved, onTouchPressed, onTouchReleased, onTouchStationary, onZoomFinished, onZoom, onZoomStarted, opacity, parent, pickOnBounds, pressed, rotate, rotationAxis, scaleX, scaleY, scaleZ, scene, style, translateX, translateY, translateZ, viewOrder, visible -
Field Summary
Fields declared in class javafx.scene.layout.Region
USE_COMPUTED_SIZE, USE_PREF_SIZEFields declared in class javafx.scene.Node
BASELINE_OFFSET_SAME_AS_HEIGHT -
Constructor Summary
Constructors -
Method Summary
Modifier and TypeMethodDescriptionRepresents the cell factory that will be used for creating TreeCells, which are used to represent items in the TreeView.voidInstructs the TreeView to begin editing the given TreeItem, if the TreeView iseditable.final BooleanPropertySpecifies whether this TreeView is editable - only if the TreeView and the TreeCells within it are both editable will a TreeCell be able to go into their editing state.static <T> EventType<TreeView.EditEvent<T>> An EventType that indicates some edit event has occurred.static <T> EventType<TreeView.EditEvent<T>> An EventType used to indicate that an edit event has just been canceled within the TreeView upon which the event was fired.static <T> EventType<TreeView.EditEvent<T>> An EventType that is used to indicate that an edit in a TreeView has been committed.final ReadOnlyObjectProperty<TreeItem<T>> A property used to represent the TreeItem currently being edited in the TreeView, if editing is taking place, or null if no item is being edited.static <T> EventType<TreeView.EditEvent<T>> An EventType used to indicate that an edit event has started within the TreeView upon which the event was fired.final ReadOnlyIntegerPropertyRepresents the number of tree nodes presently able to be visible in the TreeView.final DoublePropertySpecifies whether this control has cells that are a fixed height (of the specified value).final ObjectProperty<FocusModel<TreeItem<T>>> The FocusModel provides the API through which it is possible to control focus on zero or one rows of the TreeView.Returns the cell factory that will be used for creating TreeCells, which are used to represent items in the TreeView, or null if no custom cell factory has been set.static List<CssMetaData<? extends Styleable, ?>> Gets theCssMetaDataassociated with this class, which may include theCssMetaDataof its superclasses.List<CssMetaData<? extends Styleable, ?>> Gets the unmodifiable list of the control's CSS-styleable properties.Returns the TreeItem that is currently being edited in the TreeView, or null if no item is being edited.final intGets the value of theexpandedItemCountproperty.final doubleReturns the fixed cell size value.final FocusModel<TreeItem<T>> Returns the currently installedFocusModel.static intgetNodeLevel(TreeItem<?> node) Deprecated.This method does not correctly calculate the distance from the given TreeItem to the root of the TreeView.final EventHandler<TreeView.EditEvent<T>> Returns theEventHandlerthat will be called when the user cancels an edit.final EventHandler<TreeView.EditEvent<T>> Returns theEventHandlerthat will be called when the user commits an edit.final EventHandler<TreeView.EditEvent<T>> Returns theEventHandlerthat will be called when the user begins an edit.Gets the value of theonScrollToproperty.getRoot()Returns the current root node of this TreeView, or null if no root node is specified.intReturns the index position of the given TreeItem, assuming that it is currently accessible through the tree hierarchy (most notably, that all parent tree items are expanded).final MultipleSelectionModel<TreeItem<T>> Returns the currently installed selection model.getTreeItem(int row) Returns the TreeItem in the given index, or null if it is out of bounds.intgetTreeItemLevel(TreeItem<?> node) Returns the number of levels of 'indentation' of the given TreeItem, based on how many times getParent() can be recursively called.final booleanGets the value of theeditableproperty.final booleanReturns true if the root of the TreeView should be shown, and false if it should not.final ObjectProperty<EventHandler<TreeView.EditEvent<T>>> This event handler will be fired when the user cancels editing a cell.final ObjectProperty<EventHandler<TreeView.EditEvent<T>>> This property is used when the user performs an action that should result in their editing input being persisted.final ObjectProperty<EventHandler<TreeView.EditEvent<T>>> This event handler will be fired when the user successfully initiates editing.Called when there's a request to scroll an index into view usingscrollTo(int)voidrefresh()Callingrefresh()forces the TreeView control to recreate and repopulate the cells necessary to populate the visual bounds of the control.final ObjectProperty<TreeItem<T>> Property representing the root node of the TreeView.voidscrollTo(int index) Scrolls the TreeView such that the item in the given index is visible to the end user.final ObjectProperty<MultipleSelectionModel<TreeItem<T>>> The SelectionModel provides the API through which it is possible to select single or multiple items within a TreeView, as well as inspect which rows have been selected by the user.final voidSets the cell factory that will be used for creating TreeCells, which are used to represent items in the TreeView.final voidsetEditable(boolean value) Sets the value of theeditableproperty.final voidsetFixedCellSize(double value) Sets the new fixed cell size for this control.final voidsetFocusModel(FocusModel<TreeItem<T>> value) Sets theFocusModelto be used in the TreeView.final voidsetOnEditCancel(EventHandler<TreeView.EditEvent<T>> value) Sets theEventHandlerthat will be called when the user cancels an edit.final voidsetOnEditCommit(EventHandler<TreeView.EditEvent<T>> value) Sets theEventHandlerthat will be called when the user commits an edit.final voidsetOnEditStart(EventHandler<TreeView.EditEvent<T>> value) Sets theEventHandlerthat will be called when the user begins an edit.voidsetOnScrollTo(EventHandler<ScrollToEvent<Integer>> value) Sets the value of theonScrollToproperty.final voidSets the root node in this TreeView.final voidsetSelectionModel(MultipleSelectionModel<TreeItem<T>> value) Sets theMultipleSelectionModelto be used in the TreeView.final voidsetShowRoot(boolean value) Specifies whether the rootTreeItemshould be shown within this TreeView.final BooleanPropertyProperty that represents whether or not the TreeView root node is visible.Methods declared in class javafx.scene.control.Control
computeMaxHeight, computeMaxWidth, computeMinHeight, computeMinWidth, contextMenuProperty, createDefaultSkin, getContextMenu, getCssMetaData, getInitialFocusTraversable, getSkin, getTooltip, isResizable, setContextMenu, setSkin, setTooltip, skinProperty, tooltipPropertyMethods declared in class javafx.scene.layout.Region
backgroundProperty, borderProperty, cacheShapeProperty, centerShapeProperty, computePrefHeight, computePrefWidth, getBackground, getBorder, getHeight, getInsets, getMaxHeight, getMaxWidth, getMinHeight, getMinWidth, getOpaqueInsets, getPadding, getPrefHeight, getPrefWidth, getShape, getUserAgentStylesheet, getWidth, heightProperty, insetsProperty, isCacheShape, isCenterShape, isScaleShape, isSnapToPixel, layoutInArea, layoutInArea, layoutInArea, layoutInArea, maxHeight, maxHeightProperty, maxWidth, maxWidthProperty, minHeight, minHeightProperty, minWidth, minWidthProperty, opaqueInsetsProperty, paddingProperty, positionInArea, positionInArea, prefHeight, prefHeightProperty, prefWidth, prefWidthProperty, resize, scaleShapeProperty, setBackground, setBorder, setCacheShape, setCenterShape, setHeight, setMaxHeight, setMaxSize, setMaxWidth, setMinHeight, setMinSize, setMinWidth, setOpaqueInsets, setPadding, setPrefHeight, setPrefSize, setPrefWidth, setScaleShape, setShape, setSnapToPixel, setWidth, shapeProperty, snappedBottomInset, snappedLeftInset, snappedRightInset, snappedTopInset, snapPosition, snapPositionX, snapPositionY, snapSize, snapSizeX, snapSizeY, snapSpace, snapSpaceX, snapSpaceY, snapToPixelProperty, widthPropertyMethods declared in class javafx.scene.Parent
getBaselineOffset, getChildren, getChildrenUnmodifiable, getManagedChildren, getStylesheets, isNeedsLayout, layout, layoutChildren, needsLayoutProperty, requestLayout, requestParentLayout, setNeedsLayout, updateBoundsMethods declared in class javafx.scene.Node
accessibleHelpProperty, accessibleRoleDescriptionProperty, accessibleRoleProperty, accessibleTextProperty, addEventFilter, addEventHandler, applyCss, autosize, blendModeProperty, boundsInLocalProperty, boundsInParentProperty, buildEventDispatchChain, cacheHintProperty, cacheProperty, clipProperty, computeAreaInScreen, contains, contains, cursorProperty, depthTestProperty, disabledProperty, disableProperty, effectiveNodeOrientationProperty, effectProperty, eventDispatcherProperty, executeAccessibleAction, fireEvent, focusedProperty, focusTraversableProperty, focusVisibleProperty, focusWithinProperty, getAccessibleHelp, getAccessibleRole, getAccessibleRoleDescription, getAccessibleText, getBlendMode, getBoundsInLocal, getBoundsInParent, getCacheHint, getClip, getContentBias, getCursor, getDepthTest, getEffect, getEffectiveNodeOrientation, getEventDispatcher, getId, getInitialCursor, getInputMethodRequests, getLayoutBounds, getLayoutX, getLayoutY, getLocalToParentTransform, getLocalToSceneTransform, getNodeOrientation, getOnContextMenuRequested, getOnDragDetected, getOnDragDone, getOnDragDropped, getOnDragEntered, getOnDragExited, getOnDragOver, getOnInputMethodTextChanged, getOnKeyPressed, getOnKeyReleased, getOnKeyTyped, getOnMouseClicked, getOnMouseDragEntered, getOnMouseDragExited, getOnMouseDragged, getOnMouseDragOver, getOnMouseDragReleased, getOnMouseEntered, getOnMouseExited, getOnMouseMoved, getOnMousePressed, getOnMouseReleased, getOnRotate, getOnRotationFinished, getOnRotationStarted, getOnScroll, getOnScrollFinished, getOnScrollStarted, getOnSwipeDown, getOnSwipeLeft, getOnSwipeRight, getOnSwipeUp, getOnTouchMoved, getOnTouchPressed, getOnTouchReleased, getOnTouchStationary, getOnZoom, getOnZoomFinished, getOnZoomStarted, getOpacity, getParent, getProperties, getPseudoClassStates, getRotate, getRotationAxis, getScaleX, getScaleY, getScaleZ, getScene, getStyle, getStyleableParent, getStyleClass, getTransforms, getTranslateX, getTranslateY, getTranslateZ, getTypeSelector, getUserData, getViewOrder, hasProperties, hoverProperty, idProperty, inputMethodRequestsProperty, intersects, intersects, isCache, isDisable, isDisabled, isFocused, isFocusTraversable, isFocusVisible, isFocusWithin, isHover, isManaged, isMouseTransparent, isPickOnBounds, isPressed, isVisible, layoutBoundsProperty, layoutXProperty, layoutYProperty, localToParent, localToParent, localToParent, localToParent, localToParent, localToParentTransformProperty, localToScene, localToScene, localToScene, localToScene, localToScene, localToScene, localToScene, localToScene, localToScene, localToScene, localToSceneTransformProperty, localToScreen, localToScreen, localToScreen, localToScreen, localToScreen, lookup, lookupAll, managedProperty, mouseTransparentProperty, nodeOrientationProperty, notifyAccessibleAttributeChanged, onContextMenuRequestedProperty, onDragDetectedProperty, onDragDoneProperty, onDragDroppedProperty, onDragEnteredProperty, onDragExitedProperty, onDragOverProperty, onInputMethodTextChangedProperty, onKeyPressedProperty, onKeyReleasedProperty, onKeyTypedProperty, onMouseClickedProperty, onMouseDragEnteredProperty, onMouseDragExitedProperty, onMouseDraggedProperty, onMouseDragOverProperty, onMouseDragReleasedProperty, onMouseEnteredProperty, onMouseExitedProperty, onMouseMovedProperty, onMousePressedProperty, onMouseReleasedProperty, onRotateProperty, onRotationFinishedProperty, onRotationStartedProperty, onScrollFinishedProperty, onScrollProperty, onScrollStartedProperty, onSwipeDownProperty, onSwipeLeftProperty, onSwipeRightProperty, onSwipeUpProperty, onTouchMovedProperty, onTouchPressedProperty, onTouchReleasedProperty, onTouchStationaryProperty, onZoomFinishedProperty, onZoomProperty, onZoomStartedProperty, opacityProperty, parentProperty, parentToLocal, parentToLocal, parentToLocal, parentToLocal, parentToLocal, pickOnBoundsProperty, pressedProperty, pseudoClassStateChanged, queryAccessibleAttribute, relocate, removeEventFilter, removeEventHandler, requestFocus, requestFocusTraversal, resizeRelocate, rotateProperty, rotationAxisProperty, scaleXProperty, scaleYProperty, scaleZProperty, sceneProperty, sceneToLocal, sceneToLocal, sceneToLocal, sceneToLocal, sceneToLocal, sceneToLocal, sceneToLocal, sceneToLocal, screenToLocal, screenToLocal, screenToLocal, setAccessibleHelp, setAccessibleRole, setAccessibleRoleDescription, setAccessibleText, setBlendMode, setCache, setCacheHint, setClip, setCursor, setDepthTest, setDisable, setDisabled, setEffect, setEventDispatcher, setEventHandler, setFocused, setFocusTraversable, setHover, setId, setInputMethodRequests, setLayoutX, setLayoutY, setManaged, setMouseTransparent, setNodeOrientation, setOnContextMenuRequested, setOnDragDetected, setOnDragDone, setOnDragDropped, setOnDragEntered, setOnDragExited, setOnDragOver, setOnInputMethodTextChanged, setOnKeyPressed, setOnKeyReleased, setOnKeyTyped, setOnMouseClicked, setOnMouseDragEntered, setOnMouseDragExited, setOnMouseDragged, setOnMouseDragOver, setOnMouseDragReleased, setOnMouseEntered, setOnMouseExited, setOnMouseMoved, setOnMousePressed, setOnMouseReleased, setOnRotate, setOnRotationFinished, setOnRotationStarted, setOnScroll, setOnScrollFinished, setOnScrollStarted, setOnSwipeDown, setOnSwipeLeft, setOnSwipeRight, setOnSwipeUp, setOnTouchMoved, setOnTouchPressed, setOnTouchReleased, setOnTouchStationary, setOnZoom, setOnZoomFinished, setOnZoomStarted, setOpacity, setPickOnBounds, setPressed, setRotate, setRotationAxis, setScaleX, setScaleY, setScaleZ, setStyle, setTranslateX, setTranslateY, setTranslateZ, setUserData, setViewOrder, setVisible, snapshot, snapshot, startDragAndDrop, startFullDrag, styleProperty, toBack, toFront, toString, translateXProperty, translateYProperty, translateZProperty, usesMirroring, viewOrderProperty, visiblePropertyMethods declared in class java.lang.Object
clone, equals, finalize, getClass, hashCode, notify, notifyAll, wait, wait, waitMethods declared in interface javafx.css.Styleable
getStyleableNode
-
Property Details
-
cellFactory
-
root
Property representing the root node of the TreeView.- See Also:
-
showRoot
Property that represents whether or not the TreeView root node is visible.- See Also:
-
selectionModel
The SelectionModel provides the API through which it is possible to select single or multiple items within a TreeView, as well as inspect which rows have been selected by the user. Note that it has a generic type that must match the type of the TreeView itself.- See Also:
-
focusModel
The FocusModel provides the API through which it is possible to control focus on zero or one rows of the TreeView. Generally the default implementation should be more than sufficient.- See Also:
-
expandedItemCount
Represents the number of tree nodes presently able to be visible in the TreeView. This is essentially the count of all expanded tree items, and their children.
For example, if just the root node is visible, the expandedItemCount will be one. If the root had three children and the root was expanded, the value will be four.
- Since:
- JavaFX 8.0
- See Also:
-
fixedCellSize
Specifies whether this control has cells that are a fixed height (of the specified value). If this value is less than or equal to zero, then all cells are individually sized and positioned. This is a slow operation. Therefore, when performance matters and developers are not dependent on variable cell sizes it is a good idea to set the fixed cell size value. Generally cells are around 24px, so setting a fixed cell size of 24 is likely to result in very little difference in visuals, but a improvement to performance.To set this property via CSS, use the -fx-fixed-cell-size property. This should not be confused with the -fx-cell-size property. The difference between these two CSS properties is that -fx-cell-size will size all cells to the specified size, but it will not enforce that this is the only size (thus allowing for variable cell sizes, and preventing the performance gains from being possible). Therefore, when performance matters use -fx-fixed-cell-size, instead of -fx-cell-size. If both properties are specified in CSS, -fx-fixed-cell-size takes precedence.
- Since:
- JavaFX 8.0
- See Also:
-
editable
Specifies whether this TreeView is editable - only if the TreeView and the TreeCells within it are both editable will a TreeCell be able to go into their editing state.- See Also:
-
editingItem
A property used to represent the TreeItem currently being edited in the TreeView, if editing is taking place, or null if no item is being edited.
It is not possible to set the editing item, instead it is required that you call
edit(javafx.scene.control.TreeItem).- See Also:
-
onEditStart
This event handler will be fired when the user successfully initiates editing.- See Also:
-
onEditCommit
This property is used when the user performs an action that should result in their editing input being persisted.
The EventHandler in this property should not be called directly - instead call
Cell.commitEdit(java.lang.Object)from within your custom TreeCell. This will handle firing this event, updating the view, and switching out of the editing state.- See Also:
-
onEditCancel
This event handler will be fired when the user cancels editing a cell.- See Also:
-
onScrollTo
Called when there's a request to scroll an index into view usingscrollTo(int)- Since:
- JavaFX 8.0
- See Also:
-
-
Constructor Details
-
TreeView
public TreeView()Creates an empty TreeView.Refer to the
TreeViewclass documentation for details on the default state of other properties. -
TreeView
-
-
Method Details
-
editAnyEvent
An EventType that indicates some edit event has occurred. It is the parent type of all other edit events:editStartEvent(),editCommitEvent()andeditCancelEvent().- Type Parameters:
T- the type of the TreeItem instances used in this TreeView- Returns:
- An EventType that indicates some edit event has occurred.
-
editStartEvent
An EventType used to indicate that an edit event has started within the TreeView upon which the event was fired.- Type Parameters:
T- the type of the TreeItem instances used in this TreeView- Returns:
- An EventType used to indicate that an edit event has started.
-
editCancelEvent
An EventType used to indicate that an edit event has just been canceled within the TreeView upon which the event was fired.- Type Parameters:
T- the type of the TreeItem instances used in this TreeView- Returns:
- An EventType used to indicate that an edit event has just been canceled.
-
editCommitEvent
An EventType that is used to indicate that an edit in a TreeView has been committed. This means that user has made changes to the data of a TreeItem, and that the UI should be updated.- Type Parameters:
T- the type of the TreeItem instances used in this TreeView- Returns:
- An EventType that is used to indicate that an edit in a TreeView has been committed.
-
getNodeLevel
Deprecated.This method does not correctly calculate the distance from the given TreeItem to the root of the TreeView. As of JavaFX 8.0_20, the proper way to do this is viagetTreeItemLevel(TreeItem)Returns the number of levels of 'indentation' of the given TreeItem, based on how many timesTreeItem.getParent()can be recursively called. If the TreeItem does not have any parent set, the returned value will be zero. For each time getParent() is recursively called, the returned value is incremented by one.Important note: This method is deprecated as it does not consider the root node. This means that this method will iterate past the root node of the TreeView control, if the root node has a parent. If this is important, call
getTreeItemLevel(TreeItem)instead.- Parameters:
node- The TreeItem for which the level is needed.- Returns:
- An integer representing the number of parents above the given node, or -1 if the given TreeItem is null.
-
setCellFactory
Sets the cell factory that will be used for creating TreeCells, which are used to represent items in the TreeView. The factory works identically to the cellFactory in ListView and other complex composite controls. It is called to create a new TreeCell only when the system has determined that it doesn't have enough cells to represent the currently visible items. The TreeCell is reused by the system to represent different items in the tree when possible.Refer to the
Cellclass documentation for more details.- Parameters:
value- TheCallbackto use for generating TreeCell instances, or null if the default cell factory should be used.
-
getCellFactory
-
cellFactoryProperty
-
setRoot
-
getRoot
-
rootProperty
Property representing the root node of the TreeView.- Returns:
- the root node property
- See Also:
-
setShowRoot
public final void setShowRoot(boolean value) Specifies whether the rootTreeItemshould be shown within this TreeView.- Parameters:
value- If true, the root TreeItem will be shown, and if false it will be hidden.
-
isShowRoot
public final boolean isShowRoot()Returns true if the root of the TreeView should be shown, and false if it should not. By default, the root TreeItem is visible in the TreeView.- Returns:
- true if the root of the TreeView should be shown
-
showRootProperty
Property that represents whether or not the TreeView root node is visible.- Returns:
- the show root property
- See Also:
-
setSelectionModel
Sets theMultipleSelectionModelto be used in the TreeView. Despite a TreeView requiring aMultipleSelectionModel, it is possible to configure it to only allow single selection (seeMultipleSelectionModel.setSelectionMode(javafx.scene.control.SelectionMode)for more information).- Parameters:
value- theMultipleSelectionModelto be used
-
getSelectionModel
Returns the currently installed selection model.- Returns:
- the currently installed selection model
-
selectionModelProperty
The SelectionModel provides the API through which it is possible to select single or multiple items within a TreeView, as well as inspect which rows have been selected by the user. Note that it has a generic type that must match the type of the TreeView itself.- Returns:
- the selection model property
- See Also:
-
setFocusModel
Sets theFocusModelto be used in the TreeView.- Parameters:
value- theFocusModelto be used
-
getFocusModel
Returns the currently installedFocusModel.- Returns:
- the currently installed
FocusModel
-
focusModelProperty
The FocusModel provides the API through which it is possible to control focus on zero or one rows of the TreeView. Generally the default implementation should be more than sufficient.- Returns:
- the focus model property
- See Also:
-
expandedItemCountProperty
Represents the number of tree nodes presently able to be visible in the TreeView. This is essentially the count of all expanded tree items, and their children.
For example, if just the root node is visible, the expandedItemCount will be one. If the root had three children and the root was expanded, the value will be four.
- Returns:
- the
expandedItemCountproperty - Since:
- JavaFX 8.0
- See Also:
-
getExpandedItemCount
public final int getExpandedItemCount()Gets the value of theexpandedItemCountproperty.- Property description:
Represents the number of tree nodes presently able to be visible in the TreeView. This is essentially the count of all expanded tree items, and their children.
For example, if just the root node is visible, the expandedItemCount will be one. If the root had three children and the root was expanded, the value will be four.
- Returns:
- the value of the
expandedItemCountproperty - Since:
- JavaFX 8.0
- See Also:
-
setFixedCellSize
public final void setFixedCellSize(double value) Sets the new fixed cell size for this control. Any value greater than zero will enable fixed cell size mode, whereas a zero or negative value (or Region.USE_COMPUTED_SIZE) will be used to disabled fixed cell size mode.- Parameters:
value- The new fixed cell size value, or a value less than or equal to zero (or Region.USE_COMPUTED_SIZE) to disable.- Since:
- JavaFX 8.0
-
getFixedCellSize
public final double getFixedCellSize()Returns the fixed cell size value. A value less than or equal to zero is used to represent that fixed cell size mode is disabled, and a value greater than zero represents the size of all cells in this control.- Returns:
- A double representing the fixed cell size of this control, or a value less than or equal to zero if fixed cell size mode is disabled.
- Since:
- JavaFX 8.0
-
fixedCellSizeProperty
Specifies whether this control has cells that are a fixed height (of the specified value). If this value is less than or equal to zero, then all cells are individually sized and positioned. This is a slow operation. Therefore, when performance matters and developers are not dependent on variable cell sizes it is a good idea to set the fixed cell size value. Generally cells are around 24px, so setting a fixed cell size of 24 is likely to result in very little difference in visuals, but a improvement to performance.To set this property via CSS, use the -fx-fixed-cell-size property. This should not be confused with the -fx-cell-size property. The difference between these two CSS properties is that -fx-cell-size will size all cells to the specified size, but it will not enforce that this is the only size (thus allowing for variable cell sizes, and preventing the performance gains from being possible). Therefore, when performance matters use -fx-fixed-cell-size, instead of -fx-cell-size. If both properties are specified in CSS, -fx-fixed-cell-size takes precedence.
- Returns:
- the fixed cell size property
- Since:
- JavaFX 8.0
- See Also:
-
setEditable
public final void setEditable(boolean value) Sets the value of theeditableproperty.- Property description:
- Specifies whether this TreeView is editable - only if the TreeView and the TreeCells within it are both editable will a TreeCell be able to go into their editing state.
- Parameters:
value- the value for theeditableproperty- See Also:
-
isEditable
public final boolean isEditable()Gets the value of theeditableproperty.- Property description:
- Specifies whether this TreeView is editable - only if the TreeView and the TreeCells within it are both editable will a TreeCell be able to go into their editing state.
- Returns:
- the value of the
editableproperty - See Also:
-
editableProperty
Specifies whether this TreeView is editable - only if the TreeView and the TreeCells within it are both editable will a TreeCell be able to go into their editing state.- Returns:
- the editable property
- See Also:
-
getEditingItem
-
editingItemProperty
A property used to represent the TreeItem currently being edited in the TreeView, if editing is taking place, or null if no item is being edited.
It is not possible to set the editing item, instead it is required that you call
edit(javafx.scene.control.TreeItem).- Returns:
- the editing item property
- See Also:
-
setOnEditStart
Sets theEventHandlerthat will be called when the user begins an edit.- Parameters:
value- theEventHandlerthat will be called when the user begins an edit
-
getOnEditStart
Returns theEventHandlerthat will be called when the user begins an edit.- Returns:
- the
EventHandlerwhen the user begins an edit
-
onEditStartProperty
This event handler will be fired when the user successfully initiates editing.- Returns:
- the event handler when the user successfully initiates editing
- See Also:
-
setOnEditCommit
Sets theEventHandlerthat will be called when the user commits an edit.- Parameters:
value- theEventHandlerthat will be called when the user commits an edit
-
getOnEditCommit
Returns theEventHandlerthat will be called when the user commits an edit.- Returns:
- the
EventHandlerthat will be called when the user commits an edit
-
onEditCommitProperty
This property is used when the user performs an action that should result in their editing input being persisted.
The EventHandler in this property should not be called directly - instead call
Cell.commitEdit(java.lang.Object)from within your custom TreeCell. This will handle firing this event, updating the view, and switching out of the editing state.- Returns:
- the event handler when the user performs an action that result in their editing input being persisted
- See Also:
-
setOnEditCancel
Sets theEventHandlerthat will be called when the user cancels an edit.- Parameters:
value- theEventHandlerthat will be called when the user cancels an edit
-
getOnEditCancel
Returns theEventHandlerthat will be called when the user cancels an edit.- Returns:
- the
EventHandlerthat will be called when the user cancels an edit
-
onEditCancelProperty
This event handler will be fired when the user cancels editing a cell.- Returns:
- the event handler will be fired when the user cancels editing a cell
- See Also:
-
edit
Instructs the TreeView to begin editing the given TreeItem, if the TreeView iseditable. Once this method is called, if the currentcell factoryis set up to support editing, the Cell will switch its visual state to enable the user input to take place.- Parameters:
item- The TreeItem in the TreeView that should be edited.
-
scrollTo
public void scrollTo(int index) Scrolls the TreeView such that the item in the given index is visible to the end user.- Parameters:
index- The index that should be made visible to the user, assuming of course that it is greater than, or equal to 0, and less than the number of the visible items in the TreeView.
-
setOnScrollTo
Sets the value of theonScrollToproperty.- Property description:
- Called when there's a request to scroll an index into view using
scrollTo(int) - Parameters:
value- the value for theonScrollToproperty- Since:
- JavaFX 8.0
- See Also:
-
getOnScrollTo
Gets the value of theonScrollToproperty.- Property description:
- Called when there's a request to scroll an index into view using
scrollTo(int) - Returns:
- the value of the
onScrollToproperty - Since:
- JavaFX 8.0
- See Also:
-
onScrollToProperty
Called when there's a request to scroll an index into view usingscrollTo(int)- Returns:
- the
onScrollToproperty - Since:
- JavaFX 8.0
- See Also:
-
getRow
Returns the index position of the given TreeItem, assuming that it is currently accessible through the tree hierarchy (most notably, that all parent tree items are expanded). If a parent tree item is collapsed, the result is that this method will return -1 to indicate that the given tree item is not accessible in the tree.- Parameters:
item- The TreeItem for which the index is sought.- Returns:
- An integer representing the location in the current TreeView of the first instance of the given TreeItem, or -1 if it is null or can not be found (for example, if a parent (all the way up to the root) is collapsed).
-
getTreeItem
-
getTreeItemLevel
Returns the number of levels of 'indentation' of the given TreeItem, based on how many times getParent() can be recursively called. If the given TreeItem is the root node of this TreeView, or if the TreeItem does not have any parent set, the returned value will be zero. For each time getParent() is recursively called, the returned value is incremented by one.- Parameters:
node- The TreeItem for which the level is needed.- Returns:
- An integer representing the number of parents above the given node, or -1 if the given TreeItem is null.
-
refresh
public void refresh()Callingrefresh()forces the TreeView control to recreate and repopulate the cells necessary to populate the visual bounds of the control. In other words, this forces the TreeView to update what it is showing to the user. This is useful in cases where the underlying data source has changed in a way that is not observed by the TreeView itself.- Since:
- JavaFX 8u60
-
getClassCssMetaData
Gets theCssMetaDataassociated with this class, which may include theCssMetaDataof its superclasses.- Returns:
- the
CssMetaData - Since:
- JavaFX 8.0
-
getControlCssMetaData
Gets the unmodifiable list of the control's CSS-styleable properties.- Overrides:
getControlCssMetaDatain classControl- Returns:
- the unmodifiable list of the control's CSS-styleable properties
- Since:
- JavaFX 8.0
-